1958 MGA
1500 Roadster
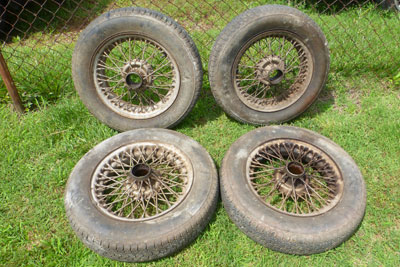
Wire Wheels
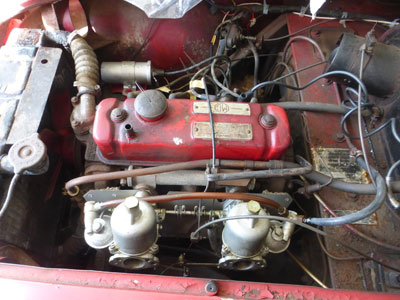
1498cc 4-Cylinder Engine
4-Speed Transmission
Parrish
Hardtop
SOLD 11/16/2017
|
1958 MGA SOLD 11/16/2017 |
|
 |
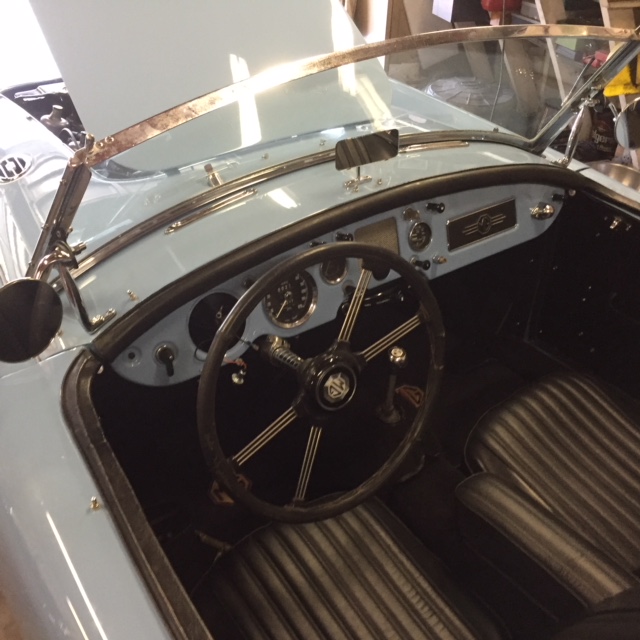 |
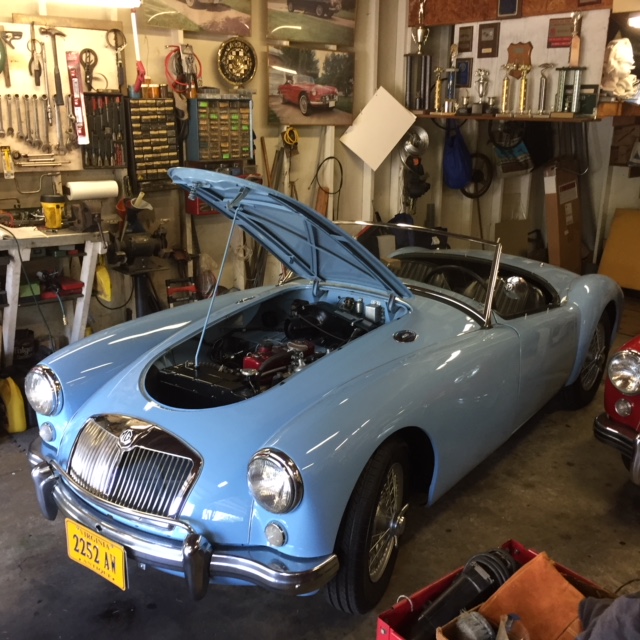
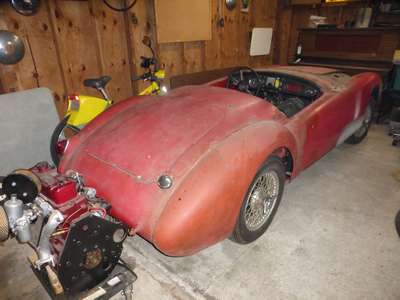
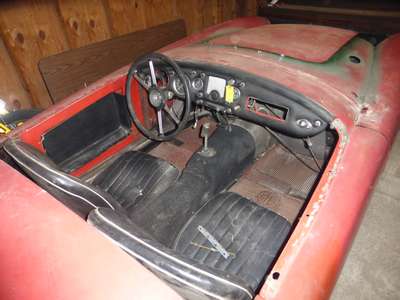
| UPDATE - June 20, 2018 - The fellow who bought the MGA got serious real quick - he took the car to one of the best body shops in the area and left it with them to redo. While the car was solid enough for a good driver, it apparently needed extensive metal work to be back in new condition - as in $15,000 worth of paint and body alone! He also lucked out and had assembly of the car taken on by one of the best MG gurus in the area. One very strange hiccup occurred when they got ready to start the 1800 engine for the first time - it had no pushrods or lifters! The 1800 had been so totally restored and was so complete that none of us ever checked it. How someone could have put on everything from air cleaners to oil filters and not installed pushrods and lifters is beyond all of us. Happily, once they were added, the car ran and drove great. And as you can see from the photos, it looks terrific. The blue is a factory color that you do not see very often. There are some minor details elft - painting the top frame and getting the electric tach installed. but otherwise, the car is ready and beautiful! | |
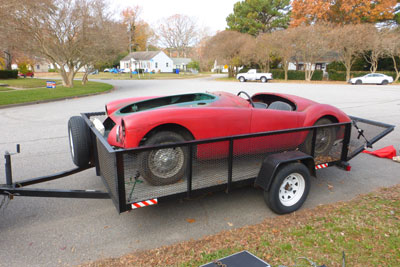 |
December 3, 2017 - It took a bit of work to get the MGA on the buyer's trailer today - it just barely fit lengthwise, and even then we had to drop the tailgate down. Then the left rear brake started dragging - the parking brake linkage was not releasing fully. Once all of that was sorted, we got the car strapped down and he rolled off. It looks like he might go with silver for the color. I'm a little sorry to see the car go, but I'd never have gotten it finished up with everything else. Besides, the TC is my convertible of choice. I am looking forward to seeing the finished product, hopefully sometime in the Spring. |
 |
 |
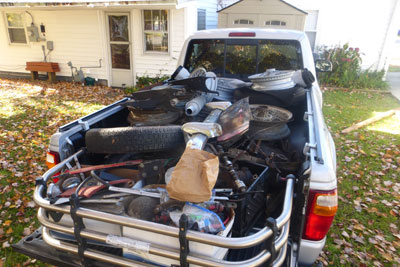
| November 24, 2017 - We started moving parts for the MGA today. I filled the back of my truck and the van, plus put a transmission, rear axle, and wheels in the back of Eric's truck. And we still have two engines, the hard top, and of course, the car left to go. There's probably a lot of small stuff I haven't found yet in the garage, the shed, and the house. I'll keep a box handy to collect things and get them to the buyer. The rest of the parts, including the car, will probably be collected next weekend. | 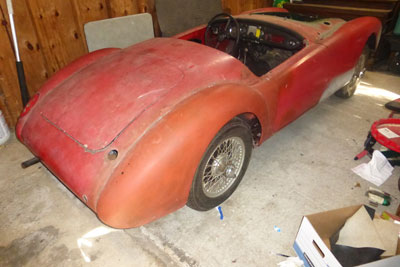 |
| November 16, 2017 - Despite my misgivings of just a few weeks ago, I have sold the MGA. I decided to list the car with the MG Club and see what happened. It got snapped up the next day - given all the parts that come with the car, it was a super deal. The fellow that bought it is going to have another club member do most of the actual work - I cheated him of his primary fun of ordering parts, because most everything is included. While I am a little sorry to give up on the car, the decision really was based on knowing that any sunny day would have me out in the TC. The new owner gets the benefit of my work and usual parts-buying mania. I am passing along everything I got for the car, including literature, manuals, and spare parts. It was painful to figure that I bought over $2000 in parts for the car myself, not counting all the parts that came with the car. Still, I will be really happy to get the garage space, plus the tremendous amount of storage space taken up by all the pieces! The plan is to focus on the cars I already have, rather than get tangled up with more projects. That's the plan, at least. Oh, look! A Morris Minor Traveler! |
| October 21, 2017 - The poor MGA has languished untouched for months now. I did get it up on jack stands and have the body almost completely stripped. Still have to loosen the fenders to pull the old welting (which was silver) and drill out screws holding one headlight bucket on. It looks like i will go ahead and replace the one bad inner rocker - silly to go this far and leave a rust hole. A friend in the car club had asked if I wanted to sell the car, and I was jaded enough to let him come by with a price set less than what I had in the car financially. Luckily, he was looking for a running car, not one at the midpoint end of a tear-down. I came to my senses and am hoping to get going on the car again soon. | 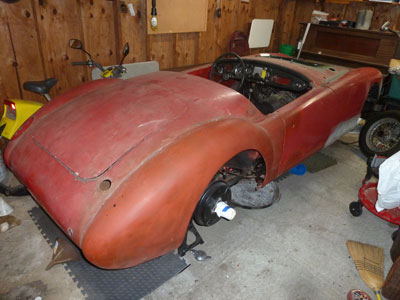 |
 |
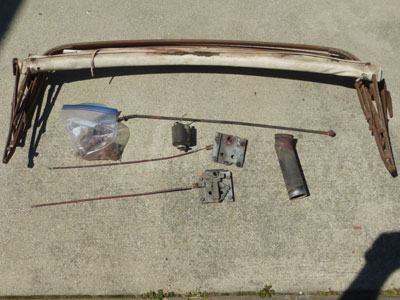 |
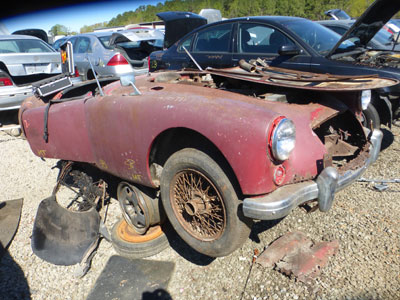
| April 9, 2017 - Our local self-serve salvage yard has had a 1961 MGA roadster in the back for two months. It was a complete, but totally ruined car that had obviously sat under tarps on grass for twenty years or more. Other than the aluminum doors and boot lid, not a single body panel was salvageable - even the aluminum hood had a rotted steel sub-structure. I waited for two months for the car to get set out, only to get a call form the manager this past Thursday - the very day I had driven down to Charlotte NC for a car show and swap meet! The car got hit by folks looking for resale items, like the grille and taillight assemblies, and the good deck lid. However, I was happy to find all the parts I wanted still present. The late models like this one had a top assembly that stored more compactly and let you put the seats further back, and I was able to snag that. I also got the door latches and catches, gas filler neck, Lucas pneumatic turn signal switch, hood prop, and assorted hardware items, all for $31. I also have a friend who is going to bring a gas welder over next month and cut in the inner driver-side rocker, which is the only sheet metal work needed before I get the car prepped for paint. | |
 |
March 28, 2017 - A little more progress - I removed the rear bumper mounts from the frame, the fuel filler assembly, and the left taillight. The body is in remarkable shape. There is very little that has to be done to the back end other than some sanding. I ordered a new nuts and washer kit for mounting the back fenders from Moss today - most fo the bolts are missing from the right side, and I can use the leftovers to replace any missing from the other three fenders. I need to loosen all of the fenders to remove the old beading and get the edges cleaned and primed. I'll be putting some spacers in between for the paint job so that the paint gets down between the body panels. |
| March 27, 2017 - I should probably be ashamed to call this progress, but even baby steps move you forward. I got the back deck cleared of hardware tonight. Amazingly, nothing was stuck or rusted solid. If I can do a little bit each night, I'll eventually get the car stripped and ready for sanding. | 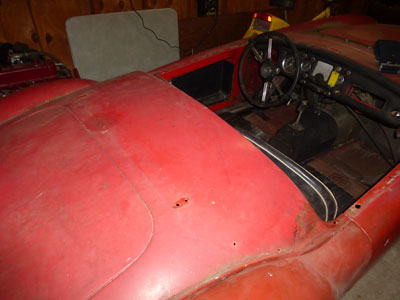 |
 |
 |
 |
March 19, 2017 - The MGA had become a storage shelf for whatever I was working on - being up front meant i had to pile things on the trunk and inside the interior. So last night I decided I needed to get serious about the car again. I shuffled cars around so that the MGA is in the more open front left corner of the garage. This also makes the Studebaker and Pontiac a lot easier to get out for drives. Today, I cleaned the car out and lay the hood back in place for safer storage. Then I removed the bad right rear fender and hung the new fender on - it fits great and looks much better (the old one was missing the lower front dogleg). The body is mostly stripped now. I need to get the inner left rocker welded in and start sanding. Some progress at least! |
| February 25, 2017 - I tried the paint and did not like it. And then I thought about the new black top, interior, and carpet, and realized a dark paint color would not look good after all. I went through several other choices - yellow, silver, light blue, and finally, a light moss green. And then last weekend, I saw a red MGA with silver wire wheels and black interior on the road. There is a reason there are so many red ones. So now I have come back full circle to the original red. In addition, I have given up the idea of painting the engine bay, door jambs, and trunk myself with rattle cans. Instead, I am going to finish stripped the car and getting the bodywork done. Then I'll take it to the paint guy for final cleanup and a total paint job. Lots of major changes of plan, but they all make sense. And more importantly, I have finally started work on the MGA again. I was able to pull the windshield, defroster vents, and cockpit surround padding today, and only had one small and easily replaceable stud break. Not bad for a 59 year-old vehicle! | 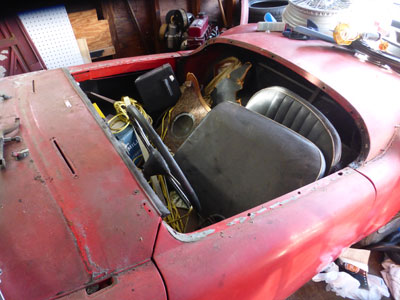 |
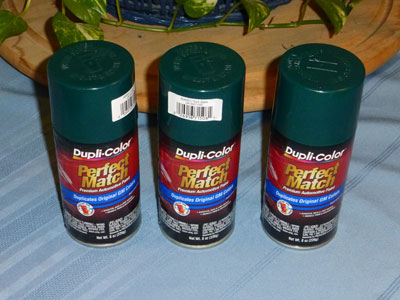 |
December 29, 2016 - Four months - that's how long it has been since I did anything of consequence to the MGA, all because i could not find rattle-can dark green paint to do the engine bay. Yes, I COULD have found something else to do rather than put everything on hold for the engine bay, but the 1989 Reatta came along and distracted me. SQUIRREL! Uh, what was I saying? Oh, right. Anyway, I was driving around in the Reatta with my visiting sister today and discovered the left front turn signal was not flashing. The bulb, of course. Which is a weird 890 type that the Pep Boy's next to the yarn shop I had taken her to did not have. (Turns out no one has it in stock - had to order it). What has all this got to do with the poor, neglected MGA? The Pep Boys had three cans of the very color paint I have been looking for! Excuses are now nil (other than getting temperatures high enough to paint). |
 |
 |
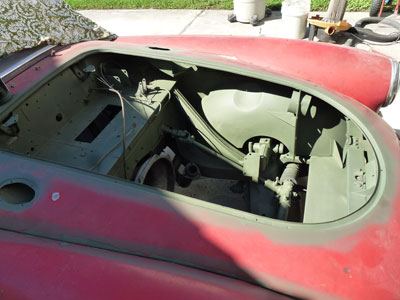
| August 23, 2016 - The weather turned cool and beautiful, and work was slow, so I took a few hours off today and came home to get the engine bay finished up. I had to do alight blast of the areas I had already done thanks to humidity that had already started some light rust. Then I finished up the rest fot he engine bay, wiped it down with pre-sol, and gave all the bare metal a coat of etching primer to seal things up. That will prevent rust until I can make a final decision on color. Still, it looks really good with the even primer coat. I made sure to get the air vent boxes and the hood channel done, since they will need to be painted when I do the engine bay. |
 |
 |
 |
 |
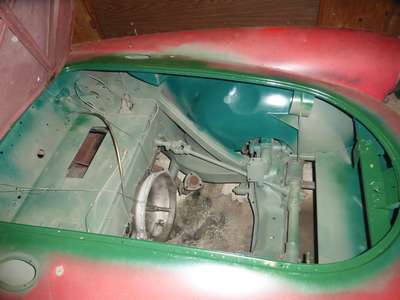
August 20, 2016 - Blistering heat and a variety of car club events have kept me out of the garage, though I did pick up some more wire wheels in North Carolina last weekend. However, this weekend, despite another big activity, I was able to make some real progress on the MGA. The engine bay is well ont he way to being stripped and prepped for paint. I bead-blasted most of the srufaces, and hope to finish up tomorrow. Then I will wipe it all down with Prep-Sol and add a coat of etching primer to keep the bare metal from rusting. I also bead blasted a front fender seam that looked a little rusty - they are weak points where the fender welting sits. Happily, the metal is great, without any pitting at all! Ken Talley, a friend in the car club who does beautiful paint work, volunteered to come over and do the color coat for the engine bay and trunk once I have it all ready. That will provide a much nice job than using the rattle cans I was planning on. |
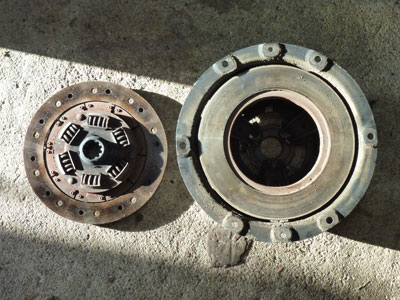
| August 5, 2016 - I got the original MGA engine off the lift and onto a rolling stand after removing the clutch assembly. I was very surprised to find it dry and looking to be in good shape. The pressure plate has to be bad to have been slipping so much, but it looked OK visually. I also got more parts removed from the MGA in preparation for cleaning and blasting the engine bay. If weather holds, I plan to start blasting this weekend. It looks like I will be picking up three more wire wheels for the MGA next weekend from a friend down in Kitty Hawk. I'm heading to New Bern NC for a national car show, and will swing by on the way down. He also has a lot of other MGA parts, so who knows what I might end up hauling back? |
 |
 |
 |
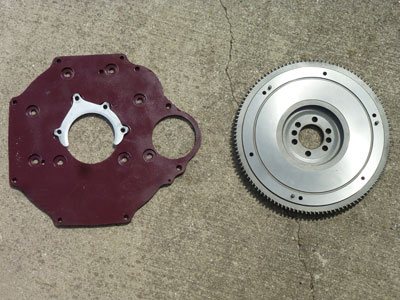 |
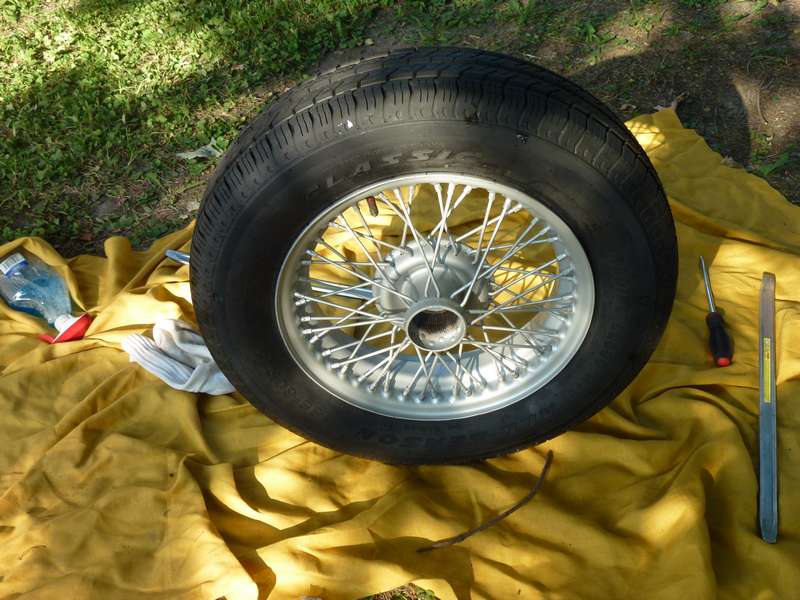
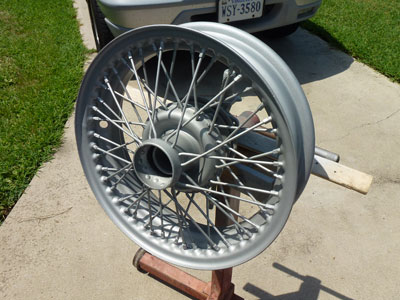
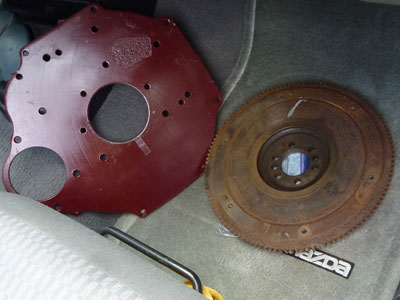
July 31, 2016 - I had two more bare wire wheels for the MGA, and both turned out to be excellent. I can't tell if they are newer replacement or very good originals, but the spokes are tight and the hub splines are clean. I bead-blasted them yesterday and painted them today. They came out very well, and I'll get the tires and tubes mounted over the week. Another move forward - I picked up the 1500 engine back plate and GB flywheel for the new engine from Abacus Racing yesterday. They bored out the back plate center hole to take an MGB main crank seal and resurfaced and cleaned up the flywheel (See July 13 post for the 'before' photo). I had asked them to drill holes in the back plate for the MGB seal retainer (silver plate on the engine back plate on left), but the machine shop manager showed me that you can use the existing bolts that hold the back plate on. As far as I can tell, I now have everything I need to drop the new engine in place. |
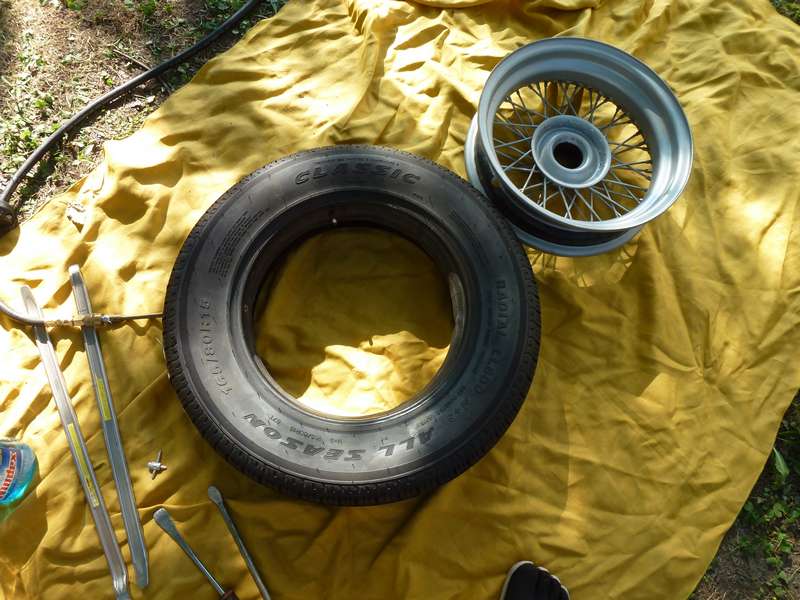
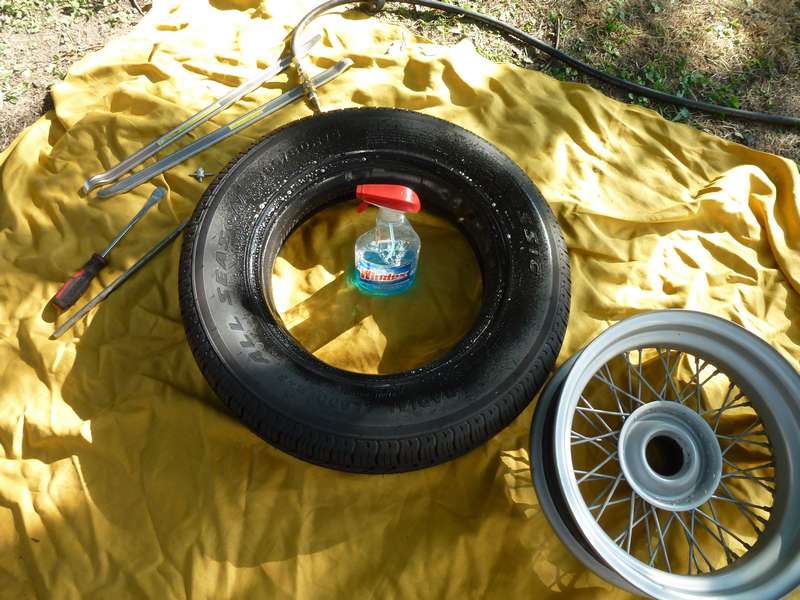
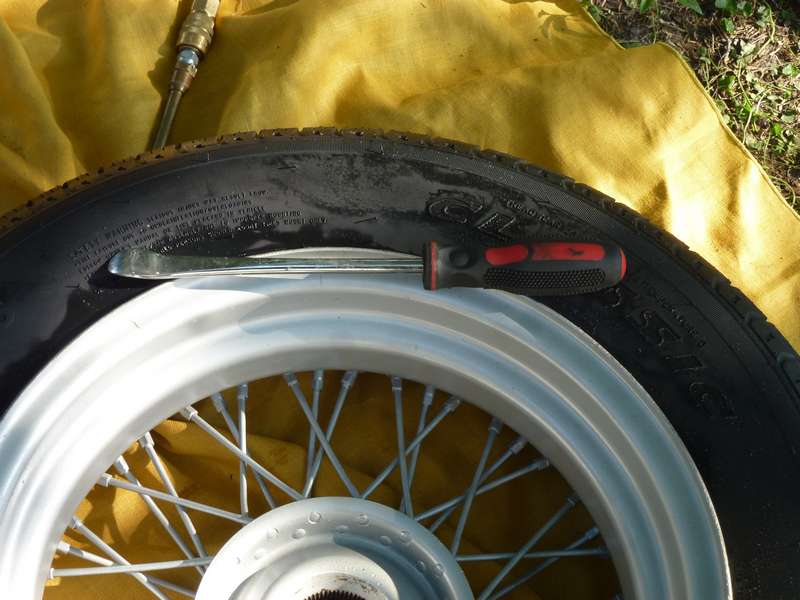
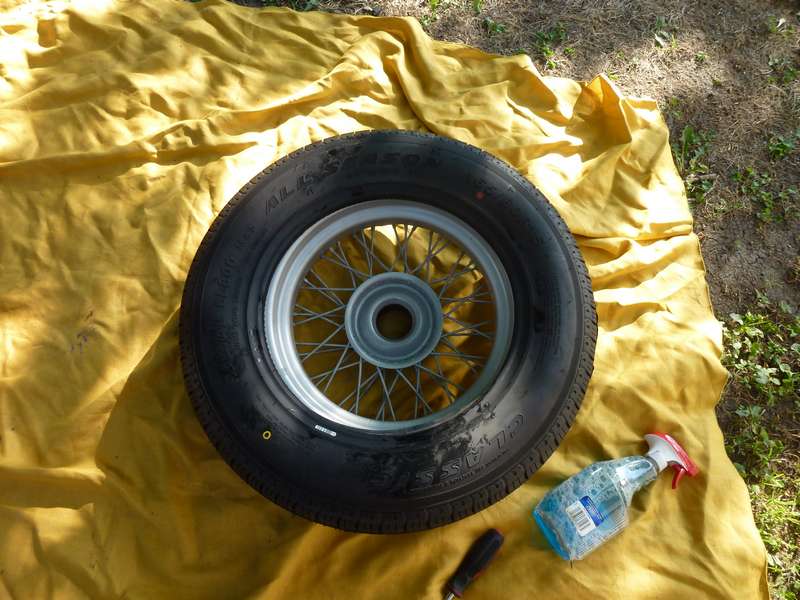
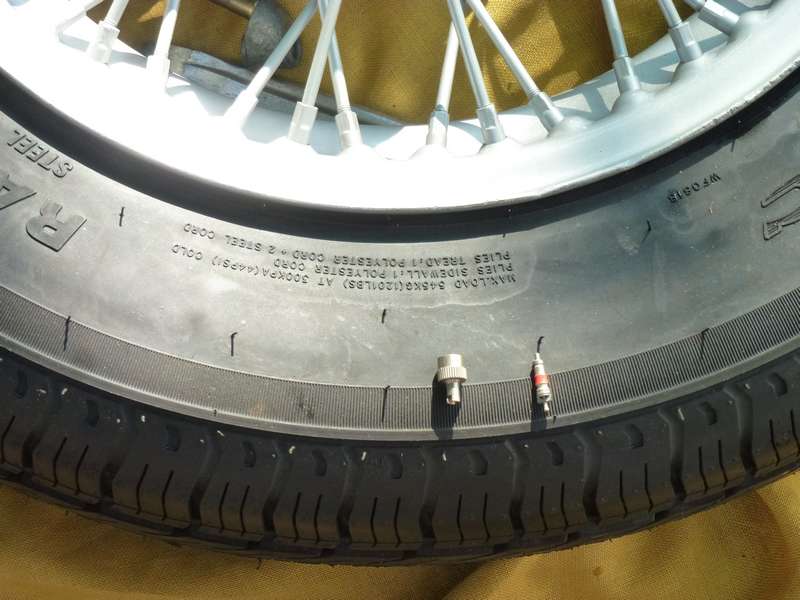
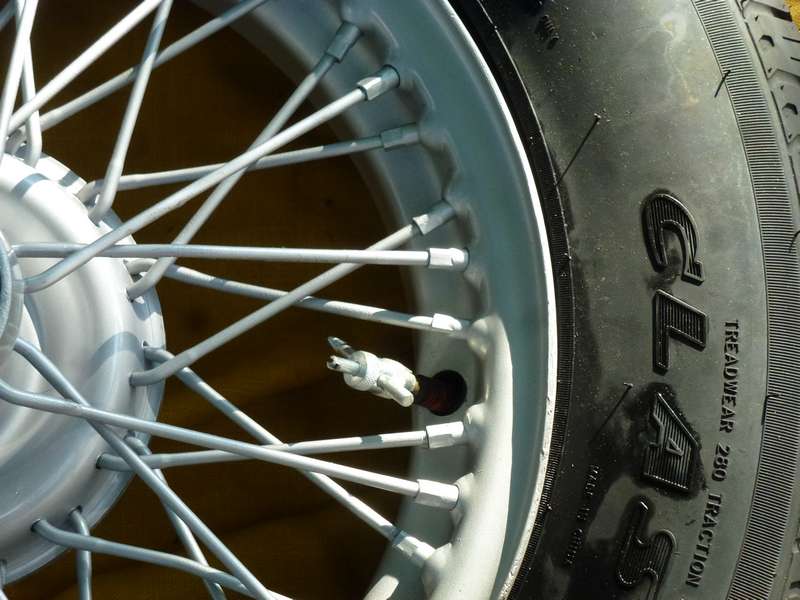
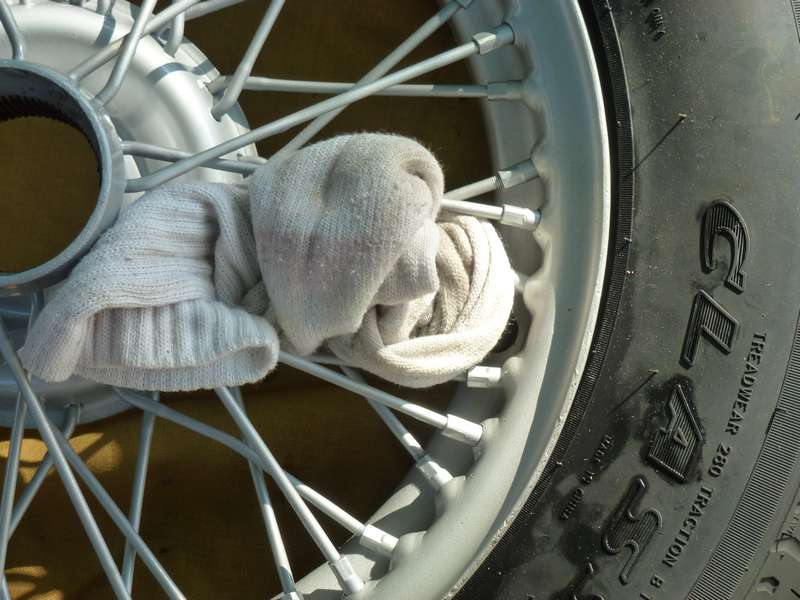
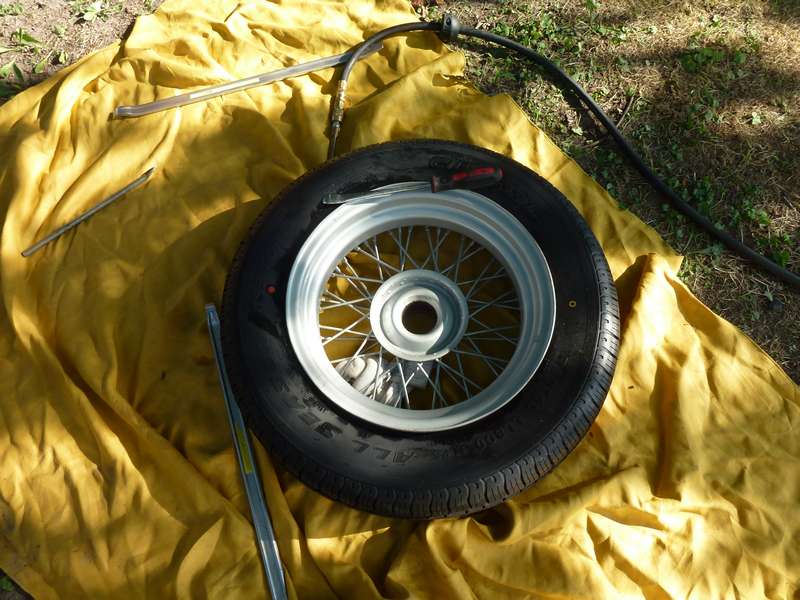
| July 27, 2016 - New wheel liners arrived today from Moss, which allowed me to mount one of the new tires on the restored wheel. The painted wire wheels are easy to scratch up, and someone who doesn't know what they are doing can destroy one. So I reach WAY back to my years as a tire store mechanic and manager to mount my own tires by hand on the TC, and now the MGA. There are a couple of tricks that make it easier, so I'll go through the process - photos are below. First of all, I installed the wheel liner - this is a giant rubber band that covers the ends of the spokes so they don't dig into the tube. Then I position the wheel face-down on a sift surface, preferably protected by cloth. I locate the serial number and set the tire so that faces me. That will put the unmarked side on the outside. I find out which side the tube stem faces (usually off-center since the hole in the wheel is on the front side) and push the deflated tube into the tire with the stem down. Next, I inflate the tube until it just fills out inside the tire. This helps avoid pinching the tube during installation. I spray the bead of the tire with Windex to lubricate it, and then place the tire on the back of the rim with the stem dawn and about where the rim hole is. I work the front or inner tire bead over the back of the rim using tire tools and my knees to hold it in place. The best tool for mounting a tire is a chrome-plated tire paddle, usually available at motorcycle stores. Once the first bead is done, get the tube valve stem pulled through the hole in front and secure it. Naturally, I could not find the special tool I have for this, but a standard valve tool will hold the valve stem in place. I wrapped an old sock around it to protect the paint. After that, you spray tha back bead with Windex and work it on, being careful not to pinch the tube. Remove the valve core from the stem and fill the tire with air until both beads seat on the rim, then let the air out. This lets the tube center itself in the wheel. Reinstall the valve core and inflate the tire to the correct pressure. Install the valve cap and you are done! I was very pleased - not a mark on the outside of the wheel, and only a couple of small scuffs inside where they don't really show. | ||||||||||||||||||||||||||||||||||||||
|
||||||||||||||||||||||||||||||||||||||
 |
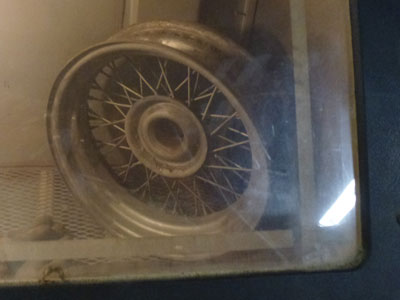 |
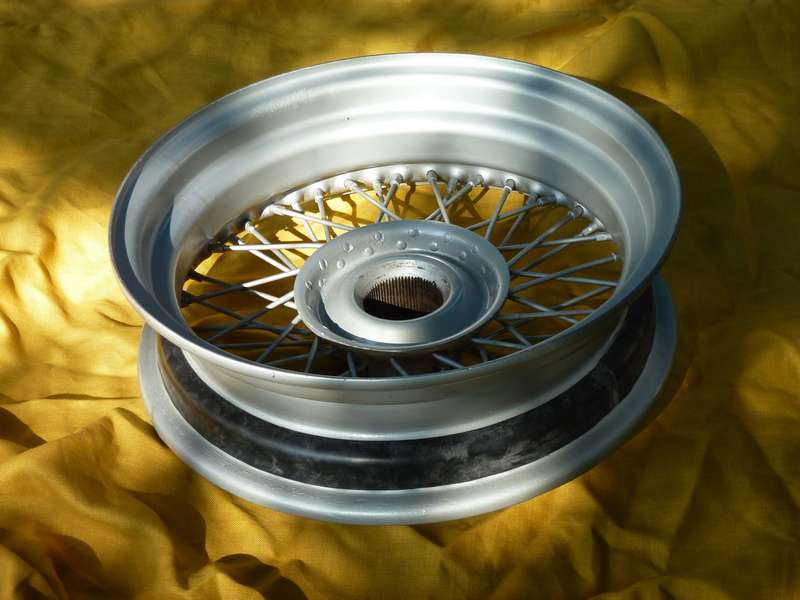
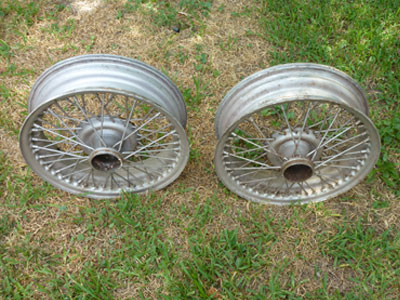
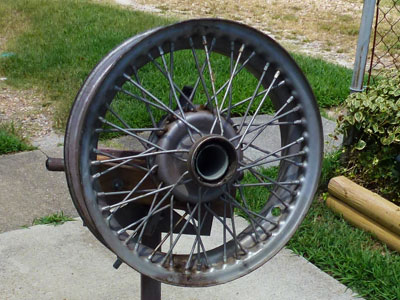
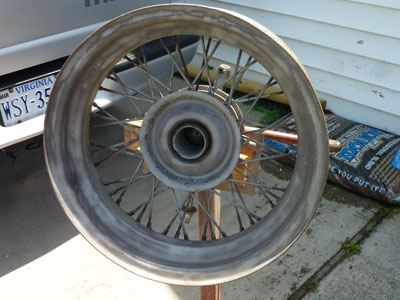
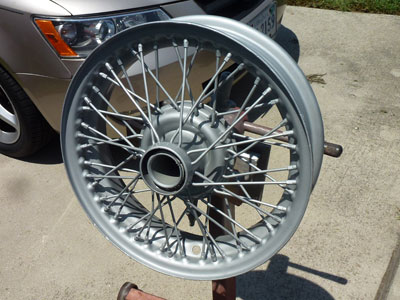
| July 24, 2016 - I picked up more parts directly from Moss Motors yesterday while on a tour with my old car club - driving Wildflower, my 1949 MG TC. Part of my order included Argent Silver wheel paint, which Moss seems to have the only source for. No other silver paint I have found has the right look and durability. At $24 a can, I suppose it NEEDS to be good! Anyway, I got enough to do all five wheels for the MGA, and decided to start with the first good one I was able to cull from the dozen I have. Wire wheels are pretty, but they are also a lot of work. The 'before picture' (top left) doesn't really show the rough condition very well, but you will notice the neat rig it is on. The man I bought the TC from gave me a spindle and hub assembly, which we put in an engine stand and used to paint Richard's TC wheels. It allows you to spin the wheel and paint evenly, preventing runs. However, before you can get new paint on, you have to get the old paint and rust off. Sandblasting wire wheels is a tedious process (top right). It took me more than 3 hours to get this relatively decent wheel stripped and ready to go (bottom left). A light sanding and then a wipe down with brake cleaner finished the preparation. As expected, the paint went on smooth and glossy, with no drips or runs. I am very pleased with the results (bottom right). I'll add the rubber liner strip and mount one of the new tubes and tires after it has had a day or so to dry. | |
 |
 |
 |
 |
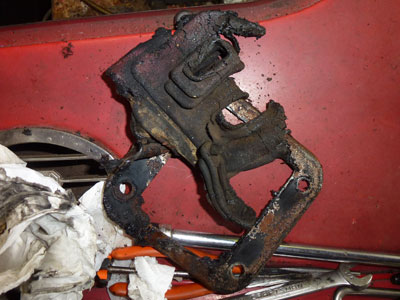 |
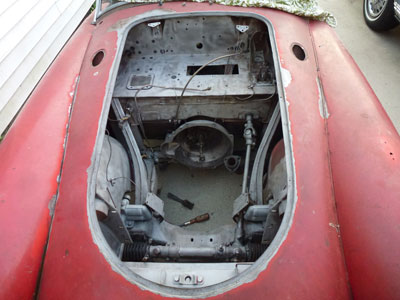
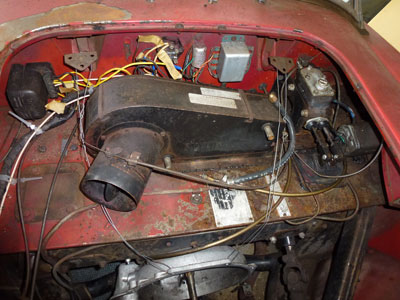
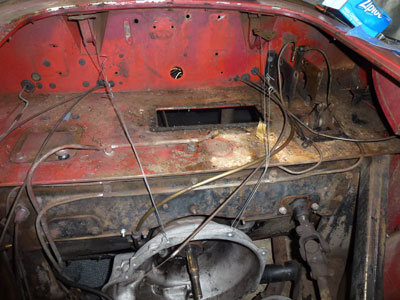
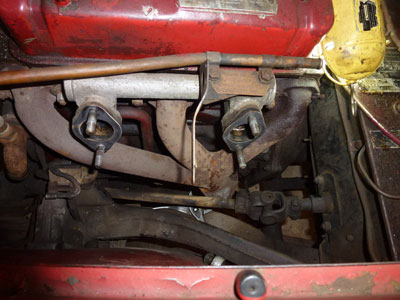
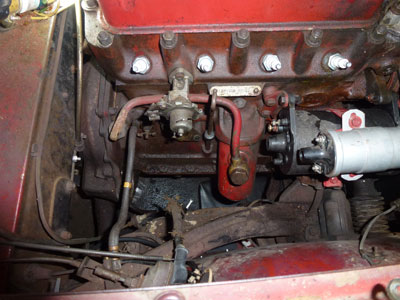
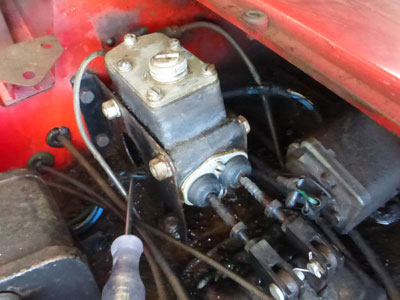
July 16, 2016 - Before I can get the engine bay painted, I have to remove all the pieces attached to it. So far, the MGA has been amazingly cooperative, with no stripped or rusted fasteners. Not everything came off easy, though -the dust seal (left) for the master cylinder had partially dissolved into a sticky black tar. And as I found when pulling the engine, working does not always mean good. The master cylinder has been up to full pressure, but I found leakage in both bores when I pulled the pushrods. That means a new master cylinder. Building these cars was definitely a team effort - most of the firewall components were held on with nuts and bots that could not be reached by the same person. I was able to make do with wrenches hanging on the bolts inside while I worked from the engine bay to get it apart, but I'll need extra hands when it comes time to put the car back together. In order to make that happen easier, I have been taking photos every step of the way, both overall and each component. I have 133 pictures of just the engine bay disassembly so far! |
| July 13, 2016 - Converting the MGA over to the 1800 engine requires some machine work - most important is the MGA low-starter 1500 engine back plate, which needs to be machined to accept an MGB 1800 rear main seal and retainer plate. The other is getting the MGB GB-series flywheel resurfaced. I dropped both off at Abacus Racing and hope to get them back in a week or so. After that it is a quick nuts and bolts job to install the engine. In the meantime, I am going to strip, sand, and repaint the engine bay. |
 |
 |
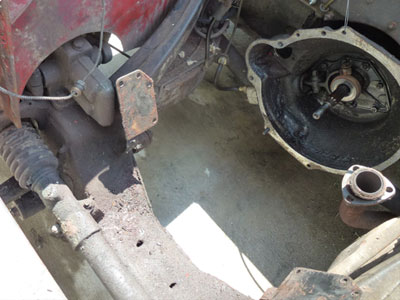 |
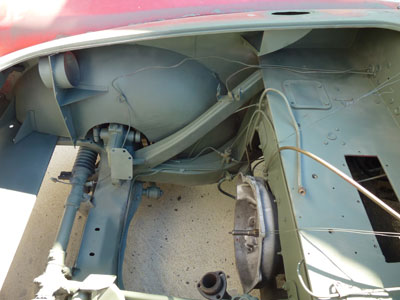
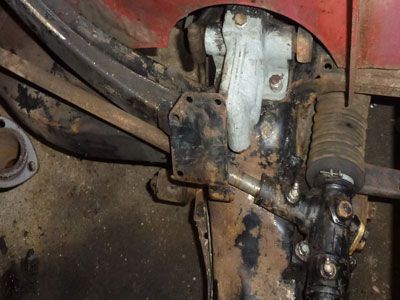
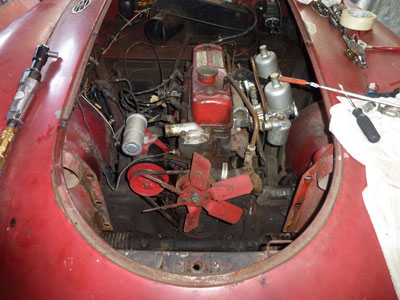
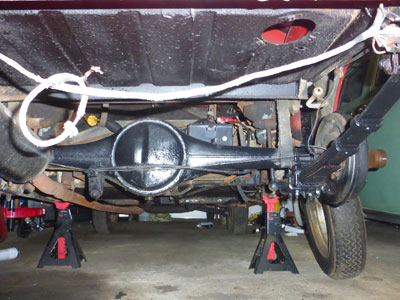
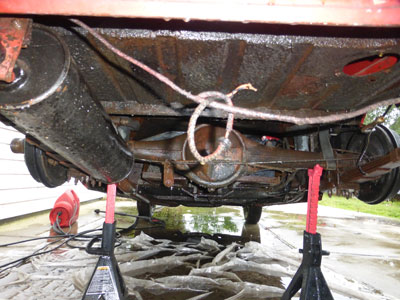
| July 9, 2016 - The MGA had 58 years of accumulated grease, oil, and dirt caked on the chassis, so I invested in a new pressure washer and went to work. It took the full 2030 PSI to knock the heavy buildup off! The good news is that everything was solid under the gook, so I can start the cleaning and painting. I plan to rebuild the front suspension and brakes while I have the car apart. Still deciding on the color - right now I am leaning toward deep red, sort of a ruby color, rather than the original orangy red. | |
 |
 |
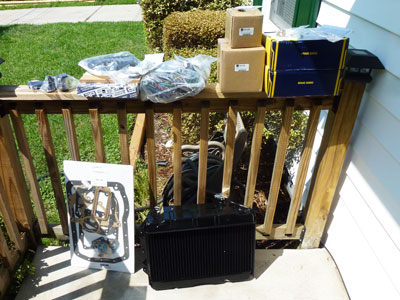 |
July 6, 2016 - Here us what $1006 of MGA parts looks like. The two big items are a new radiator and new wiring harness, both items I might have made do without, but chose to take plunge for. One $5 part was misordered - my fault, and I have plenty of time to order the right one in. Considering everything I got, the price is amazingly low. And the delivery is outstanding! I ordered these Monday night and they arrived Wednesday afternoon. When you consider the fact the MGA is 58 years old, just the availability of parts is astonishing. All stored safely in the garage now. Looks like I need to start cleanup of the engine bay and chassis. |
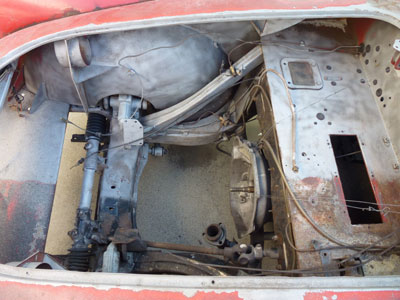
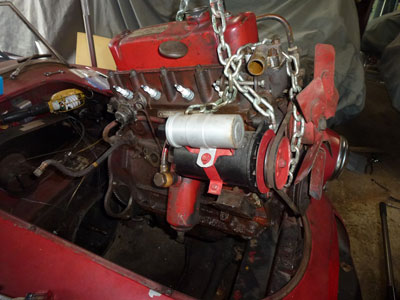
| July 4, 2016 - I celebrated Independence Day by freeing the MGA's engine! Chip came over and provided encouragement, advice, and an occasional hand (There is really only room for one around the MGA), and the job was done in just a couple of hours. This major progress inspired an even more major order of parts from Moss Motors. I sat down and figured up everything I needed to really get the MGA back together and mechanically restored: suspension kit, new brake shoes and hydraulics, new wiring harness, new radiator, new clutch, etc. This was prompted by a 'Do It Yourself' sale on most of the big parts I needed, plus free shipping on orders over $700. So I bolstered my courage and hit the 'Complete Order' button that will send all of those parts to me for a total bill of $1012.07. My wallet is still screaming, but I saved several hundred dollars on parts I really needed. |
 |
 |
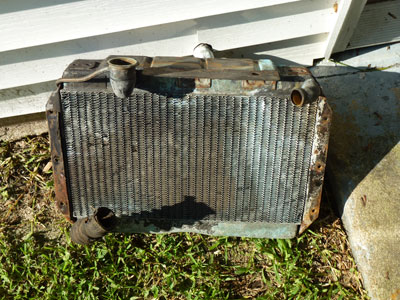 |
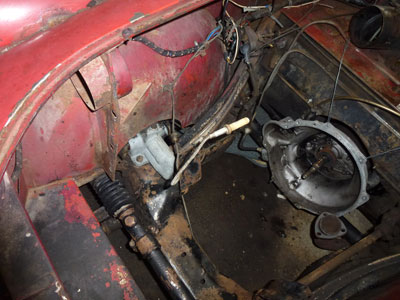
| July 2, 2016 - Beast (The Suburban) took up most of my car time the past few weeks, which itself got interrupted by some yard projects. Anyway, I have started work on the MGA again. Further investigation has revealed a bad clutch set - either due to wear or oil contamination. I suspect wear, as the jury-rigged clevis pin would have caused binding and excessive wear. Also, the MGA has not dripped oil so far. Some recent purchases and gifts include new windshield braces, the transmission front cover plate and clutch arm I need to convert the car to an MGB clutch plate, a used wiring harness, and for the impending engine removal, a new engine hoist and load leveler. When I say impending, I mean it! Disassembly has begun as of today. I pulled the radiator first, and have been working my way around the engine to remove the various accessories. Starter, distributor, carbs, exhaust downpipe, cables, etc. The radiator appears to be original and very solid. I'll drop it off at Glenrock Radiator (The guy who checked the Pontiac out) to get it cleaned and tested, I am pretty much to the point where I just have to unbolt the transmission and the motor mounts and pull the engine. Surprisingly, all of the bolts so far have come loose without any problems! | |
 |
 |
 |
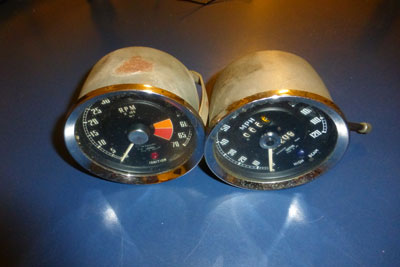 |
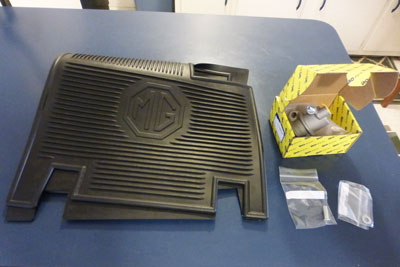
| June 8, 2016 - It's been a busy few days. Saturday night, I swapped a new TD tonneau cover for a set of MGA wire wheels with tires and a correct speedometer and tach. In truth, Jack was going to give me the parts, but he could use the tonneau and I could not, so fair is fair. That gives me at least 13 wheels to work with, so I can pick the five best and use the next four as rollers. Chip came over, and we played with the clutch linkage. A new pushrod and clevis pin did not fix the release plate issue, and I feel pressure through the entire stroke of the pedal. I think a new clutch set is in my future, which also means the new engine. A pretty easy job, actually. I also got in new floor mats and a new clutch slave just in case. |
 |
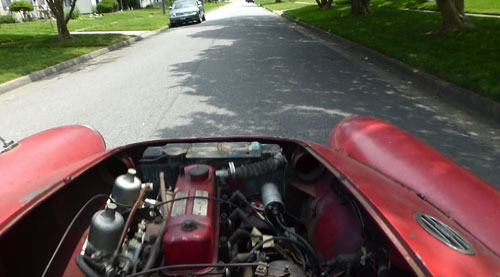
| June 4, 2016 - The big day finally arrived - I got the back wheels on the MGA and got it off the jack stands. It fired right up - however, when I let the clutch out it took a while to engage. Either severe slippage or something binding in the hydraulic system. The more I used the clutch the better it got, and it did actually chirp the tires at one point, so I am pretty sure it is the slave cylinder or linkage. Anyway, other than the clutch issue, the engine was strong, the transmission and rear axle had no unusual noises and the car felt tight. I took it a block from the house and headed back, not trusting the clutch. Smart move, as the clutch did not disengage this time. I ordered a new slave cylinder on eBay for $25 including shipping. A video of the drive is posted on YouTube: https://youtu.be/QvJc2eQPgzw |
 |
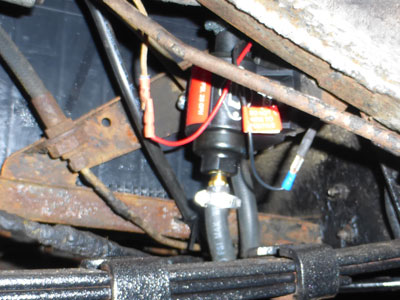 |
May 30, 2016 - I finally got the new fuel pump installed and working - the MGA now runs on its own fuel tank. Interestingly, the leaks in the carbs have sealed up on their own - I expect the cork main gaskets just needed some fuel to get them working again. Oh, the pump is a second one I had that is using the holes for the mounting plate itself to lower its position - and I reversed position so the flow is bottom to top. That solved the fuel delivery from the tank. Next ont he agenda is checking the clutch hydraulics and seeing how the MGA does in a run around the block. |
 |
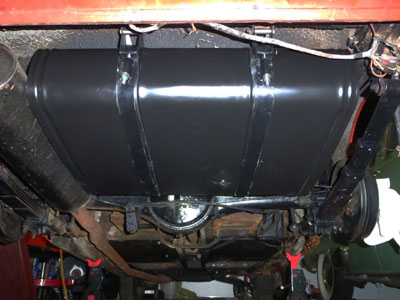 |
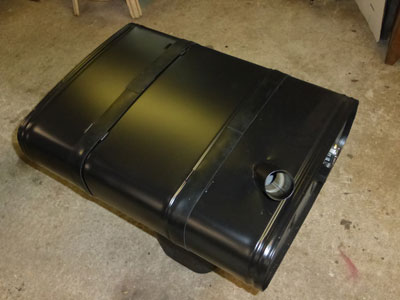
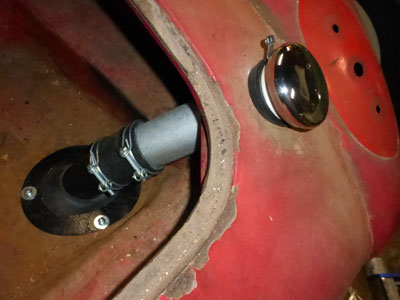
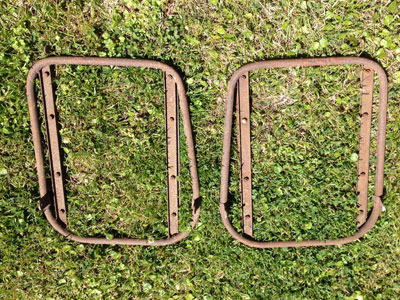
| May 22, 2016 - Although sidetracked by a troublesome water heater over the weekend, I managed to get the MGA's fuel tank installed. The rubber insulating strips were cut to length and secured using some superglue to bond the ends together. The tank straps mounted up easily, and the tank slipped into place with no issues. I used new hardware, though the original nuts and bolts were OK. I also replaced the filler cap, seals, and hose with reproductions from Moss Motors. The retainer plate for the trunk seal uses 8-32x1 screws - so tiny! Yet the original captive nuts are still in good shape. The hood and trunk (bonnet and boot) are held on with 10-32x1" bolts - they look too delicate, but are still holding firm after 58 years! I also installed the fuel pump using the original mount holes, but they place the pump in a vertical top-to-bottom flow that is restricting output. I am going to drill new holes in the mount to allow horizontal fuel flow, which should take care of the restriction. Also, the extra frame went to NC today to form the basis of another Bob's MGA restoration. |
 |
 |
May 19, 2016 - The deck lid that Jack gave me is really nice - turns out the holes are not in the right place for the new rack, but I like the bigger size and I can drill new holes and fill the old ones. And still keep the undrilled deck lid intact. I picked up the 67 transmission with the front plate I need to convert the MGA to an MGB clutch last night. |
 |
 |
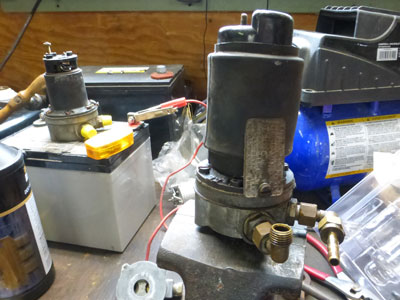
| May 17, 2016 - Some more small jobs done - the underside of the car around the fuel tank is now cleaned and painted, so I won't have to pull the tank again when I get to the point I want to spruce up the underside. And I got the new fuel pump installed - it is a totally different style from the original SU, but it bolts directly up to the old mount. Still have to get the tank in, and hook up hoses, but I am getting closer. Some goods news parts-wise - a friend in the MG Club is giving me an early MGB transmission that is bad inside, but has the cover plate I need for the 1800 engine swap! Even better, Jack Pavlidis gave me a really nice MGA deck lid already drilled for the new luggage rack that came with my car. That way I can keep the undrilled one and have the car with or without the rack. | |
 |
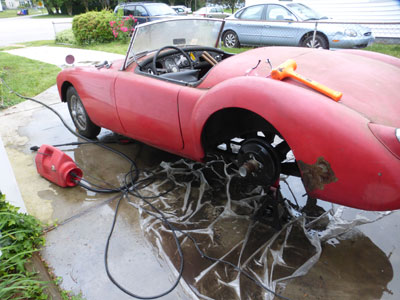 |
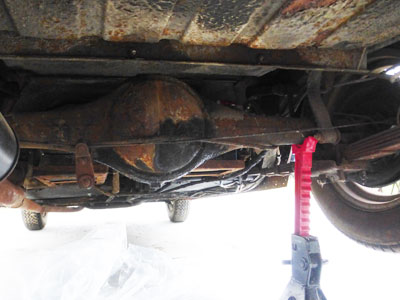
| May 12, 2016 - I got the MGA outside for the first time since I got it, and used my pressure washer on the undercarriage. There was a heavy layer of road dirt on everything, and the rear axle was caked with old grease. I'll let things dry overnight and then do some wire brushing and painting before I put the new gas tank and fuel pump in. |
 |
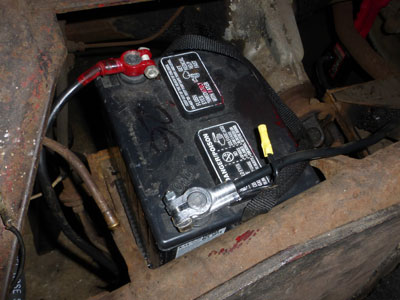 |
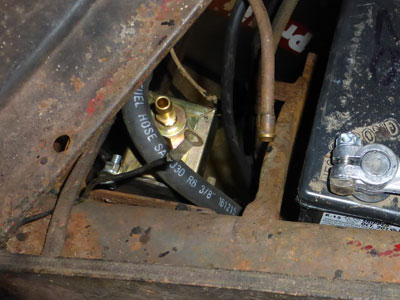
May 11, 2016 - As usual, Moss Motors had the battery cable and rubber lead covers to me pretty much overnight. (I ordered the parts late Monday night). And it did my heart good to see 'Made in England' on the bag. Anyway, since the 'correct' cable is for a positive ground system, I painted the end red. Both new cables are now installed with the car swapped over to negative ground. The only change other than switching the cables is supposed to be reversing the leads on the coil, which I also did. I'll have to get the new fuel pump installed before I can check things out on that score. |
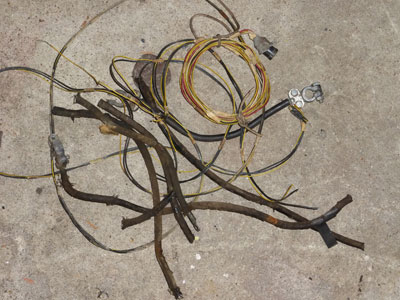
| May 9, 2016 - I got a start on replacing the battery cables tonight. The original main cable from the starter switch to the battery is almost 90" long - even the 78" cable I thought would be good did not come close. I had to cut the cable into section to remove it from the frame clamps. The smaller gauge wire is a towing light setup that was taped to the wiring harness all the way from the grille to the back end. I went ahead and ordered a new cable from Moss tonight - this is one item you do not want to 'rig'. |
 |
 |
May 8, 2016 - Both rear brakes have been checked, cleaned, and repainted in the correct black. The left side was adjusted too tight, but only took one notch adjustment to free up. The 1500 low-starter engine back plate came in and looks great. I have to have it machined for an MGB rear main seal and retainer, but with that done I can pretty much drop the 1800 engine in with no other modifications. The passenger seat frame is cleaning up - most of it is bead blasted and painted. I am trying to get a little done on the car every day, even if it is just a small job. |
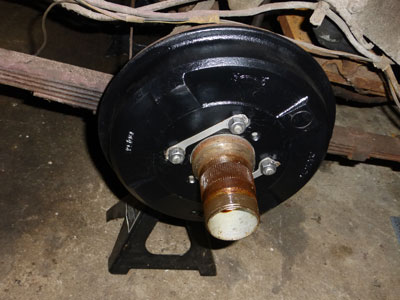
| May 5, 2016 - The fuel tank mounting straps are cleaned and painted, and I have new rubber mounting gaskets coming, as well as new hardware. I pulled the right rear brake drum off and was happy to find what I expected - clean, dry, rebuilt brakes. I bead blasted the silver-painted brake drum and will repaint it in the correct black. I also cleaned and painted the original air pump that came with the car - a wooden handled bicycle-type pump with 'Made in England' stamped on the bottom. |
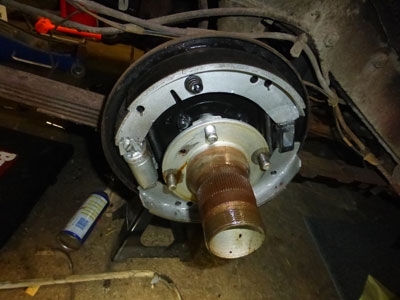 |
 |
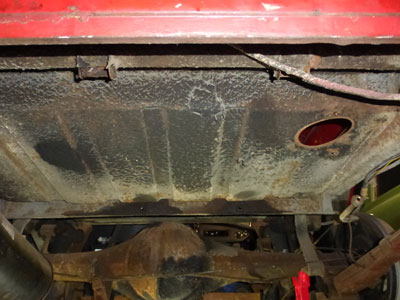 |
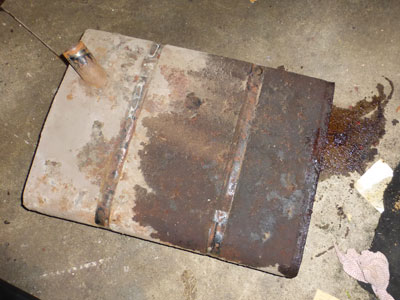
| May 4, 2016 - Baby steps on weeknights, but progress nonetheless. I was able to get the old gas tank out tonight without resorting to hacksaws. The tank is heavy from undercoating and dirt, but the metal all around looks solid. Note the gas on the floor - the top has rusted through at the seam, and it leaked when I stood the tank on its side. I am very glad I opted for the new tank! The mounting straps also came free with some penetrating oil, revealing a very solid undercarriage. I will clean up the underside and rear axle and paint everything before I put the new tank in. I also want to pull the brake drums to see what shape the rear hydraulics and shoes are in. This is the first time I have actually gotten a good look underneath. The right side inner sill has been replaced, but the left side still needs to be done. I have the sill and just need to cut out the old piece and weld (or have someone else weld) the patch panel in. That and the left fender, which has a redone replacement already, are about the only serious body work needed. On a side note, I picked up the 1500 engine rear plate I need to make the 1800 engine a bolt-in swap off eBay today. I still plan to keep the 1500 in it, but the 1800 is a great fallback. | |
| May 3, 2016 - The rest of the parts for the fuel tank swap came in - new gaskets and cap for the filler neck. I jacked up the back end and got the axle on jack stands. The gas tank is heavily undercoated, as is most of the underside. I am soaking the strap bolts with penetrating oil, but the fuel line and gauge wire came off easily. One item was curious - the fuel sending unit in the tank appears to have been installed upside down! |
 |
 |
 |
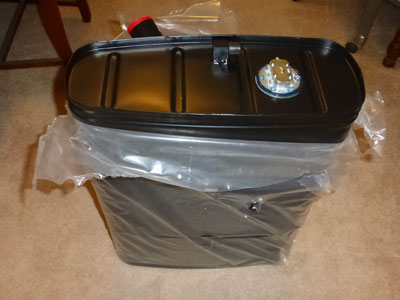
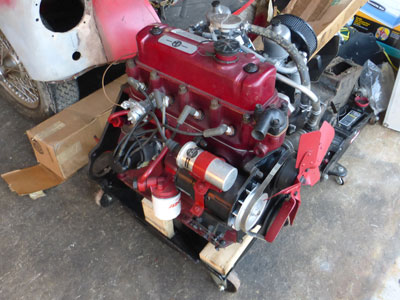
| May 1, 2016 - I got the new gas tank in from Moss and installed the new sending unit with Hylomar to seal the screws and main seal. It appears to be an exact reproduction and looks really nice. There has been a lot of research going on the past few days on what it would take to put the restored 1800 engine that came with the MGA in it. The prior owner had obviously intended to convert the car to an MGB 1800 engine/ transmission, which is a very common change. While I hate to modify the car, I had gotten the incorrect impression that the engine in the car was from a Metropolitan, so I started digging. There was no ID number on the restored 1800, but the block and cylinder head casting dates identified it as a GB series, the first of the 5-main bearing, and the most popular for the conversion. To adapt it to the MGA transmission, you need a special back plate, a GB flywheel, and an adapter bushing. I have the flywheel, and the plate and adapter bushing are readily available. However, I discovered that the 1500 engine in the car is indeed from an MGA - it has the tach takeoff from the block. No idea how we missed it before. So the 1500 will remain. Nice to have the redone backup engine, though. | |
| April 25, 2016 - Although I expect it will be quite a while before the MGA hits the road, I went ahead and titled and registered it today. I was able to get a personalized plate that works in two ways:' A1958MG'. Having it insured and tagged will also be a spur to get moving on it! |
 |
April 23, 2016 - Less than great success today - I tried to get the fuel pump rebuilt, and went through 4 different pumps trying to assemble a set of good parts. I even managed to get it 'ticking' tonight, but that was before it was finally assembled. Back to nothing. Oh, well. Just setting the points, I think, but it is best to take the advice of the experts and get a new one. I also think I will get a new fuel tank. The spare has loose rust in it, and by the time I got a tank cleaned and lined, it would be almost the same cost as a brand new one! On the plus side, I was able to move the car using the clutch. Feels very high, but smooth. I'll bleed it out to make sure there is no air in the system. |
|
|
|
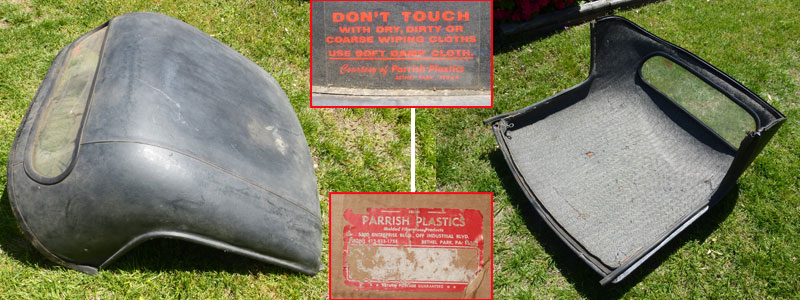
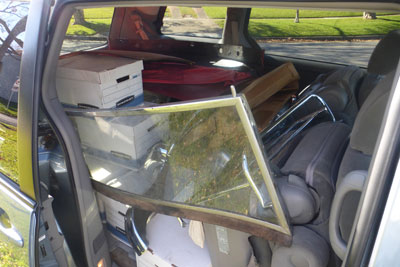
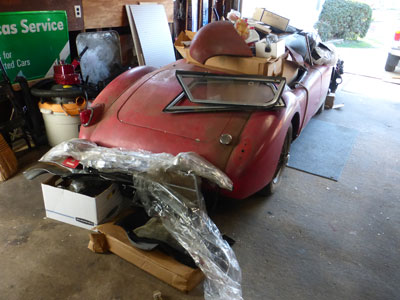
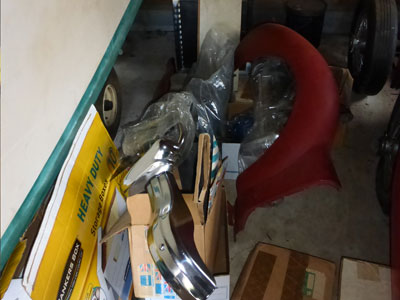
| April 20, 2016 - Had a rather amazing turn of luck today. I went back to the house where I got the MGA to search for the missing passenger seat base - the only place I had not looked was up in the overhead storage room in the barn the car was stored in. No lights up there, so I took a strap-on LED light. No missing seat base, but hidden behind the old bicycles, some old exercise equipment, and other miscellaneous junk was one very large box. When I opened the box, I discovered a hard top for the MGA! The seals and fiberglass are in excellent shape, and even the plexiglass window looks good. The box was the original box from Parrish Plastics, the manufacturer, but was too big and deteriorated to keep. I did save the label. The top is missing rear hardware to secure it, but should be similar to MGB items. However, the good news did not end there. When I called Richard to tell him the good news, he told me he might have a source for the seat frame. Less than an hour later, he had obtained left and right seat frame bottoms from a friend's parts car! |
 |
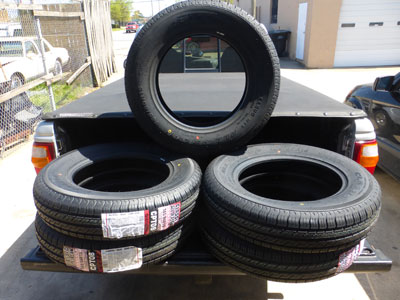 |
April 13, 2016 - A friend with car dealership was able to get a full set of five of the 165/80R15 tires the MGA takes for less than I was expecting to pay for three. A little early, I guess, but the price was right and it's looking like the MGA might hit the road a lot sooner than I ever expected. I'll pull a set of wheels and bead blast and paint them. I think I can keep a set of 'rollers' on the car until after it is painted. Which may be soon. I have someone contacting me about what it will take to get her shiny again. |
| April 10, 2016 - More happy surprises from the MGA today - I had noted previously that the dual master cylinder looked good - new outer seals and pivot pins, and generally clean. However, I had not thought to check the condition of the hydraulics. After 30 years, you usually have goo. Which makes me think that the prior owner may have started on the restoration and been working on the car a lot more recently than 1985. I have full pedal for the brakes and a smooth, solid clutch! More investigation is warranted, but I did find a receipt for a new clutch hose that is not in the spares. And the brake drums have been cleaned and painted. It is very possible that the hydraulics have already been rebuilt! |
 |
 |
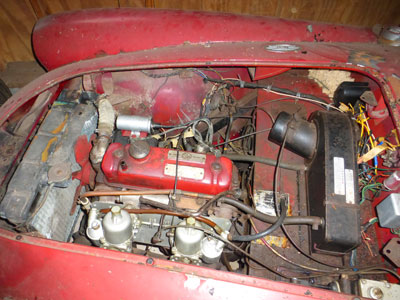
April
6, 2016 - Turns out I wasn't so overly optimistic as I thought - after
getting her points cleaned up with some emery paper, the MGA fired up and
ran great! No smoke, 50+ pounds of oil pressure, smooth and strong.
The carbs are leaking fuel, and the water pump sounds like it is going bad,
but the engine itself appears to be in terrific shape. Next, I will
get the car up on jack stands and run her through the gears to check out the
transmission and rear axle. Another pleasant surprise came when I
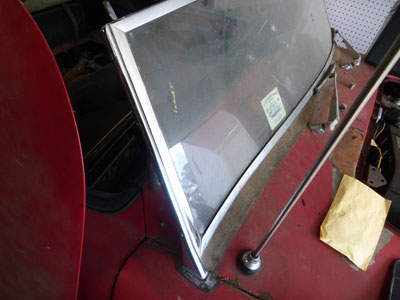
cleaned up the only expensive chrome bits that I don't have new - the
windshield posts and frame. Looks like they are going to polish up
great! You can see a video of the first startup here: https://www.youtube.com/watch?v=Gk-dia1WELU |
 |
 ` ` |
| April 4, 2016 - Well, my hopes were pretty optimistic, so I wasn't really all that surprised when getting gas to the carbs did not coax the MGA to start. At the minimum, the needle valves are stuck open, and i don't think I am getting spark. So I am going to pull back and do some basic tests first. A compression check will tell me what shape the basic engine is in, and i need to pull and clean the carbs and distributor, and verify power to the coil and points. With Charlotte this weekend, it will be a while before I can make another, more in-depth attempt to get her going. |
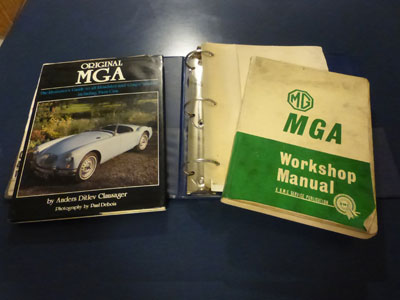 |
April 2, 2016 - I am slowly gathering books and manuals for the MGA, but I was waiting for a 'deal' on two that I wanted most - a factory repair manual, and Clausger's 'Original MGA'. Clausager did a great 'Original MGB' that I really like, and the MGA book looks to be just as good. Happily, Best Bud Chip came over this morning with both in hand, left over from his days as an MGA coupe owner. He also had a photocopy of an excellent book on restoring British cars which he presented as well. On the practical side, I also got the battery in the MGA and cranked the engine tonight. It shows 20 pounds oil pressure cranking over. I think I just need to get fuel tot he carbs and she might start! Now, if I can find my extra MGB fuel pump.... |
| March 31, 2016 - I've been making slow progress on the MGA - mostly trying to inventory what I have. Some nice surprises - Best Bud Chip pointed out that the carburetors are new (currently $1500 from Moss Motors) and everything else indicates the engine is likely to be in good condition. The master cylinder appears to be rebuilt, the oil is clean and the car has green antifreeze with no signs of rust or sludge. I got a new battery, and am going to install new cables and convert the car to negative ground. This appears to be a very simple process that should not require replacing anything. I need to check the gas tank and make sure any bad gas is out, and install a new fuel pump. Once that is done, I'll see if the car will start. Oh, the TD that was a stablemate was bought by a friend in the antique car club, and he found MGA parts in his stuff, while I am finding MG TD parts in my stash. We will be swapping things around. |
| March 21, 2016 - My first eBay purchase for the MGA showed up already - another MGA! This one is considerably smaller, but is also an original 1958 issue in the original box, and even the correct color! I also made a very good discovery tonight. I cleared the hood and gave the engine a more concerted effort at getting it to turn. And it did! The fan belt is old and loose, and I needed a better angle than I had back in its barn. | 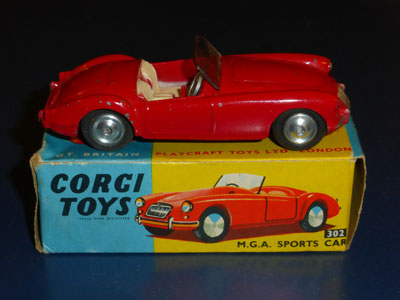 |
 |
March 20, 2016 - I was able to get the rest of the MGA parts home except for the spare rear axle, which is stored safely at a friend's garage for now. This included the spare frame, which was left back at the house where I got the car. It has been raining and cold the whole weekend, but I did not want to leave the frame too long at an empty house - it would bring a good bit for scap. Happily, the frame doesn't weigh all that much, and I was able to load and unload it alone with no damage to truck, frame, or myself. It is going to take a while for me to sort and inventory all of the MGA parts and then do a thorough study of the car's body and chassis. |
 |
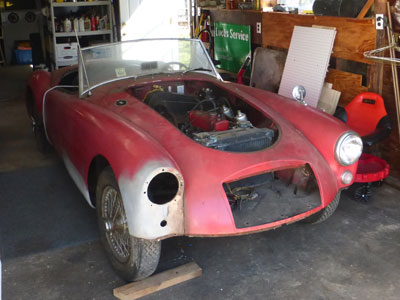 |
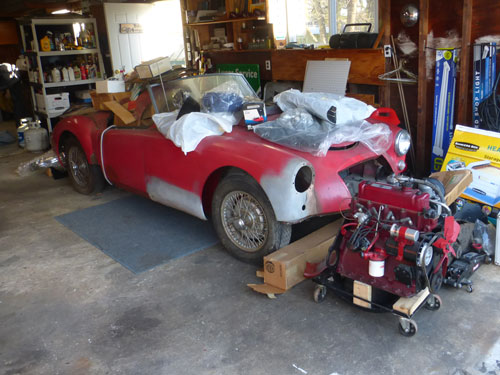
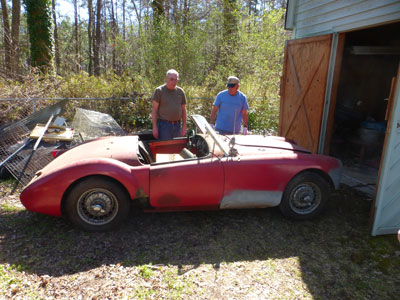
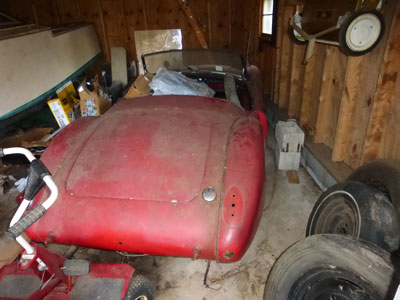
| March 17, 2016 - An actual 'barn find' in a time when that term is really overused. The MGA got rolled out for the first time in 30 years today. The car had no unhappy surprises in the sunlight, but the treasure hunt continued to uncover more parts, including a spare gas tank and the missing side windows! Friends Richard and Jack (shown behind the A top left) were instrumental in locating and moving the seemingly endless supply of pieces. We filled Jack's full-sized truck, my truck, the back of a 1974 Suburban, and still had to have parts moved by friend Dan (who also arranged for a flatbed) AND leave the spare frame to be picked up this weekend! I'll need to gather all the parts and sort them out, but what I have is really encouraging. The engine is totally restored and complete, ready to drop in. I have almost all of the interior new, including a steering wheel, all new major chrome, and many spares. The prior owner seems to have planned a major restoration and even bought repair and patch panels that the car doesn't need. Extra parts include a spare rebuilt 1500 cylinder head, multiple transmissions, starters, patch panels, flywheels, wire wheels, etc. Looks like I had the 'Luck 'o the Irish' on this St. Patrick's Day! | |
 |
 |
 |
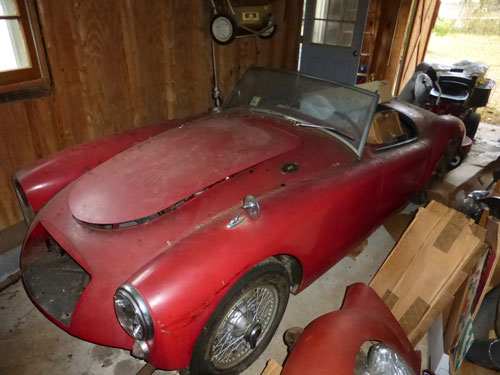 |
| March 13, 2016 - The empty space in my garage left from selling the 1967 Cougar got a lot emptier once i did a major cleaning, and it was widely speculated by all who know me that it would not stay empty for long. As of today, I am the proud owner of a 1958 MGA roadster taken off the road in 1985 for a full restoration that never started. This was a reverse of the usual buyer's remorse. Parts were scattered over three garages and inside the house, and after hours of treasure hunting, I uncovered and gathered new parts probably worth what I paid for the whole package! That does not include a rebuilt engine, three spare transmissions, a spare frame and rear axle, a spare used 1500 engine, a good replacement for the only bad fender on the car, and a host of other parts. It's a project, but a relatively easy one. That gives me one of each of the major series of MG sports cars - T, A, and B. | |
 |
 |